Descrição
Simple Tour Guide is an easy to use step-by-step onboarding user guide that lets you create an interactive guided tour for your visitors.
The plugin provides a great, neat and fast way to indroduce users to your product or service – by guiding them visually to different elements on your website.
An interactive user walkthrough is a powerful way to increase user experience and customer satisfaction. This plugin is based on Shepherd.js – an open-source lightweight vanilla js library for guided tours.
Customize the text, the number of popups (steps) and link to any DOM element through a friendly user admin interface.
Plugin Options
You can create a tour and add as many steps to it as you want from “Create a Tour” tab. You can add step title, step description, link the step to a specific dom element and add a custom class to it. You can also choose to display the tour only once or show it everytime you reload a page (test mode) and ask for confirmation when the close button is clicked. Another cool feature is the ability to choose on which pages to display the tour. If you want, you can also choose to display the tour to logged in users only and disable the rest of the site while the tour is active. You can also add a progress bar to show the users how many steps remain until the end of the tour and customize the colors of the step buttons and the progress bar via the “Style” tab.
Capturas de tela
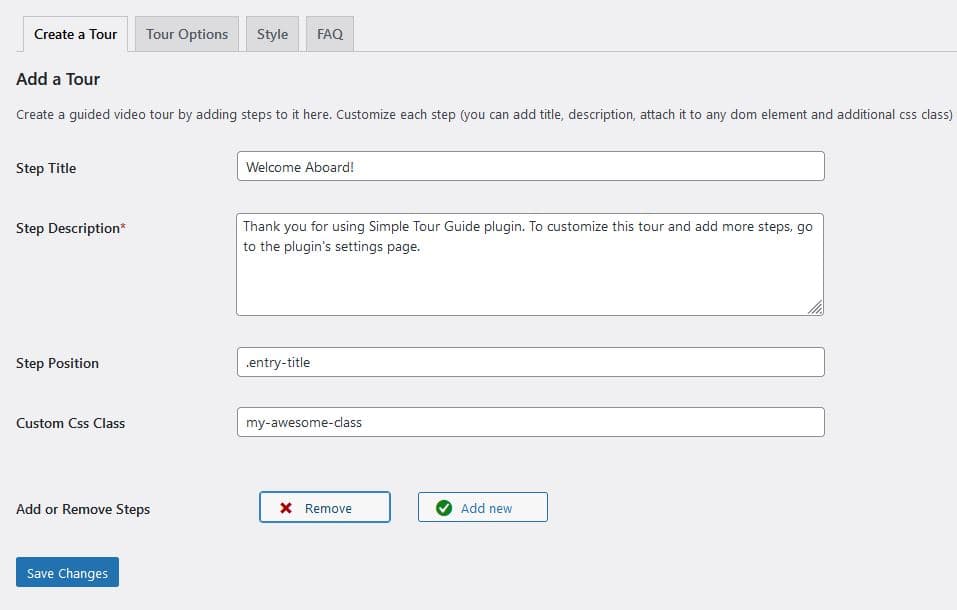
Plugin settings page: add steps 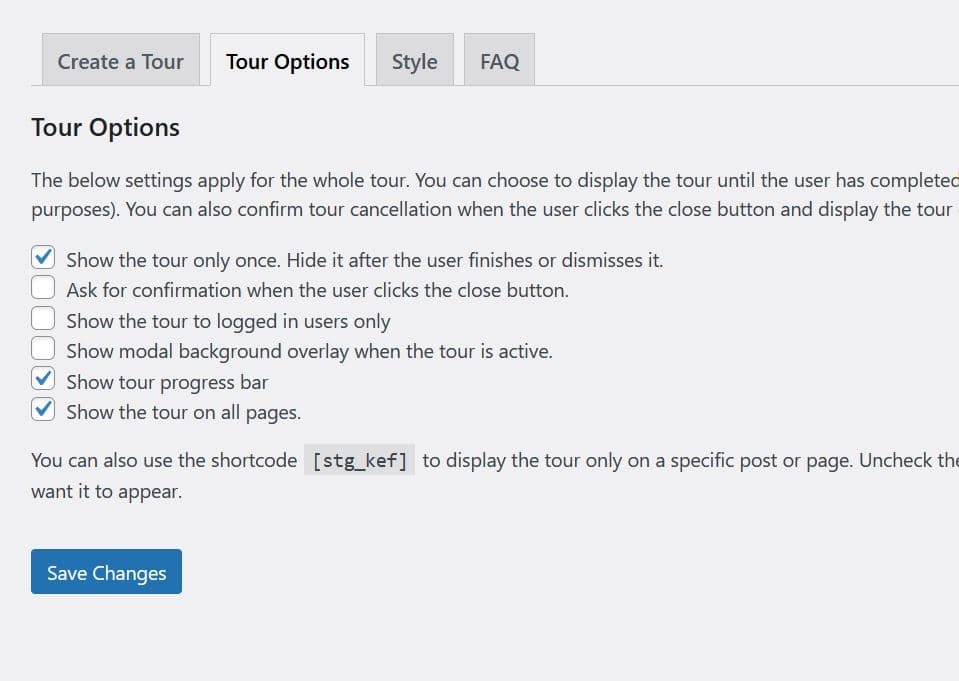
Plugin settings page: tour options 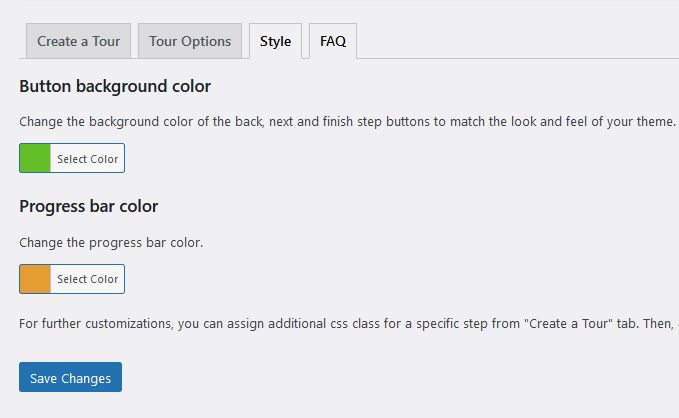
Plugin settings page: style options 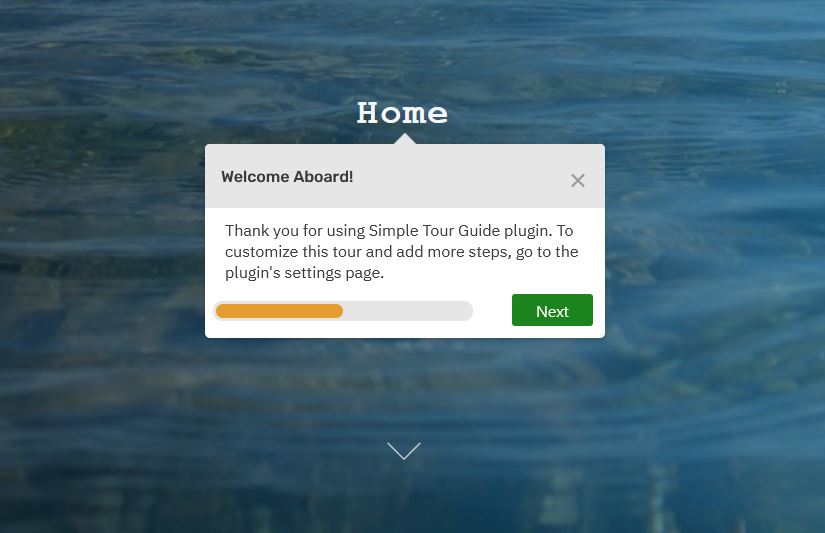
Plugin frontend
Instalação
- Take the easy route and install through the WordPress plugin installer or download the .zip file and upload the unzipped folder to the
/wp-content/plugins/directory - Activate the plugin through the ‘Plugins’ menu in WordPress
Perguntas frequentes
-
How to add, edit or delete steps?
-
From the WordPress admin, go to Settings => Simple Tour Guide and add as many steps as you want.
-
Can I link a step to a page element?
-
Sure, you can! Inspect a page element with the browser dev tool (right click with the mouse => inspect element) and then add its selector in the “Step Position” field from “Create a Tour” tab. You can add class, id or tag selector like so:
.class,#id,tag. If you do not assign a selector, that is also fine, the step will appear exactly in the middle of the screen. -
Can I show the tour only once?
-
Absolutely! In fact, by default the plugin hides the tour when the user finishes or dismisses it. However, you can also choose to display the steps on every page reload (test mode) from the “Tour Options” tab.
-
How to show the tour guide only on one page?
-
Go to “Tour Options” tab, uncheck “Show the tour on all pages” box and copy the plugin shortcode
[stg_kef]. Then, navigate to a page or post you want, click"edit"and paste the shortcode on the top of the post content. -
How to customize the style of the steps?
-
Go to “Style” tab and customize accordingly. For additional customizations, you can use the
.stgclassname or add a custom class to each step from the “Create a Tour” tab. Go toАppearance => Customize => Additional cssand add your own custom styles there. -
Can I create more than one tour?
-
In the pro version of the plugin, you can create unlimited tours. The free version supports only one tour.
-
Can I add a background overlay to disable the rest of the site while the tour is active?
-
Yes, this feature is available since version 1.03. All you need to do is check the option “Show modal background overlay when the tour is active” in the Tour options tab. This will disable any site interaction until the user has finished or dismissed the tour.
-
The tour stops when I link a step to an element that is not visible. What can I do?
-
This may happen when you link a step to a page element that is hidden with css on specific screen sizes. For example, a menu item on mobile that is hidden until the user opens the menu. If the user has not opened the menu yet, the tour might stop in the middle. Luckily, there are a few ways to handle this.
The easiest way to fix this is not to attach the step to the element and the step will appear in the middle of the screen.
Since version 1.04, you can skip a step if the element which is attached to it appears off-screen. All you need to do is go to “Tour Options” and add a tick to “Skip a step if a step is attached to an element but the element is not visible”. Please note that skipping a step will not work for elements that are completely non-existent in the DOM (for example content for logged-in users). In this case, the best option would be to use custom css to hide the step.
Another solution could be to “detach” the element from its step for that screen size only. In this way, the step will appear in the center of the screen and the tour will continue to work just fine. Add the following css to Appearance => Theme => Customize:
@media(max-width:62em) {
    .stg[data-popper-reference-hidden]{
        opacity: 1 !important;
        visibility: visible !important;
        left: 50% !important;
        top: 50% !important;
        transform: translate(-50%, -50%) !important;
        pointer-events: auto !important;
    }
    .stg[data-popper-reference-hidden] > .shepherd-arrow {
        display: none;
    }
}
The above code targets mobile and tablet users only and detaches a step that was linked to an element which is not visible.
-
I have selected the skip a step option, yet the step still shows up. What is going on?
-
The skip a step option works only for elements that are hidden or off-screen but not for non-existent elements. If the element is missing from the DOM, the step should still appear in the middle of the screen and this is the standard behavior. However, you can still hide it with custom css.
A valid use case for this is if you have extra content for logged in users and you want to hide the step that is linked to it for non-logged in users. To do that, you need to go to plugin settings page => create a tour tab => custom css class and add a custom class name to the step you want to hide, lets saymy-hidden-step. After that, go to appearance => customize => additional css and add the following code:.shepherd-enabled.my-hidden-step { visibility: hidden; } .logged-in .my-hidden-step { visibility: visible; }The above code will hide the step for non-logged in users but still show it to logged in users.
-
Can I show the tour to logged in users only?
-
Since version 1.02 you can! You can check the option “Show the tour to logged in users only” in the Tour Options tab.
-
Yes, in the pro version of the plugin, you can use a button with classname
stg-start-tour -
Can I run the tour inside the WP Admin?
-
No, the scope of this plugin is the site frontend only. To display a tour in the CMS, you can try the Custom Welcome Guide plugin.
-
Are there more options?
-
Check the premium version of the plugin. By upgrading, you will get additional options, as well as access to priority support and updates.
Avaliações
Colaboradores e desenvolvedores
“Simple Tour Guide” é um programa de código aberto. As seguintes pessoas contribuíram para este plugin.
ColaboradoresSimple Tour Guide” foi traduzido para 5 localidades. Agradecemos aos tradutores por suas contribuições.
Traduzir o “Simple Tour Guide” para seu idioma.
Interessado no desenvolvimento?
Navegue pelo código, consulte o repositório SVN ou assine o registro de desenvolvimento por RSS.
Registro de alterações
1.1.9 – December 2025
- Update docs.
1.1.8 – November 2025
- Update docs.
1.1.7 – November 2025
- Enable [stg_kef] shortcode to work inside php templates.
1.1.6 – March 2025
- Update Docs.
1.1.5 – February 2025
- Update logo and faq section.
1.1.4 – February 2025
- Update logo and docs.
1.1.3
- Add option to display the tour on desktop only.
1.1.2
- Fix bugs when removing steps in TinyMCE mode. Add confirmation check upon deleting a step.
1.1.1
- Clean up code and disable first step removal. Improve UI. Remove unnecessary step initializations before save.
1.1.0
- Add option to add html to steps.
1.0.9
- Fix tour dismisal and validate classnames
1.0.8
- Dismiss tour if the last step is skipped; show skipped steps whenever they are visible
1.0.7
- Use one js file for all supported wp versions. Update translation functions.
1.0.6
- Remove Freemius SDK. Upgrade docs. Minify shepherd js.
1.0.5
- Integrate Freemius SDK
1.0.4
- Add option to skip a step for better ux and rewrite sanitization function for backwards compatibility. Update docs.
1.0.3
- Add option to show dark modal overlay to cover the site until the user has finished the tour.
1.0.2
- Add option to show tour to logged in users only.
1.0.1
- Refactor and optimize decrement count steps function. Hide the tour afrer the user finishes or dismisses it. Update css.
1.0.0
- First publicly available version of the plugin. Update css.